Hello! I'm sorry, but we will not be able to get a craft up this Wednesday, me or Willow will do a late 4th of July craft for dolls, though. Our sincere apologies,
Silence and Willow
Every Wednesday, me(Silence)or me{Willow}will post crafts for your dolls!


Ok, here we go!


Craft #1 as of 3/21/12
(A Craft by Silence. Willow will do one next week)
Hello, there! Silence here. Today, I'm going to show (and tell) you how to make a cabinet for your doll(s)!
Let's get started, so without further ado! Pictures! YAY! Lol!

Step 1. Take your box, and cut off the top part, the 'lid'.
 When your done, it should look like this: (below)
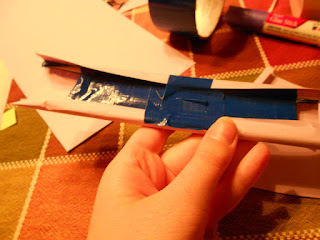
 Step 2: Open the box, put duct-tape on the inside, so it will stay together, see picture (Always below)
 See what I mean? Now the bottom of the box will stay together!! Yay!! Now just put duct tape on the rest, and on the sides, (not the flaps).
Step 3: Now, decorate the box! You can use paper to cover it, then color, whatever you want! Put sparkles, use your imagination! I know you've got one!
 That's how I decorated mine, pretty, eh? I only decorated the outsides and the sides of the outsides, but, yeah!
Step 4: Take your wooden dowels, (or chopsticks) and put them on the box like so (below) to see how big you need them to be


Silence and Willow
Every Wednesday, me(Silence)or me{Willow}will post crafts for your dolls!
Willow here!
Today we will be making a doll-sized camera out of Model Magic!
Here is what you'll need for today's craft.


- A small box of Model Magic{found at most craft stores}
- The color of the camera Model Magic of your choice{I chose Orange}
- A little bit of black{for the lens}
- A little bit of white{for under the lens}
- {Optional}A toothpick{for measurements}
- {Optional}Your doll{also for measurements}
Ok, here we go!
First, roll the camera-colored MM{Model Magic}into a small ball.

^Like So^

Good!

Now roll it into a long-ish type thing.

Give or take about the size of a toothpick.

Also about this length.

If you squish your doll's arms together slightly,
& she can hold it pretty well, that should work.

Then flatten it{not all the way!}, into a camera shape. Good!

Then roll a rather small ball of black into a really rather small ball.

Then squish it into a pancake-style circle.

Then take an even smaller ball of white, and roll it into a small ball, then squish it ever-so-slightly,

And viola!
And don't forget to add another super small ball of black for a button on top
{I forgot to take pics of that}

If you have ANY QUESTIONS AT ALL, private message me or comment on this blog. Thanks!
~Willow~
Craft #1 as of 3/21/12
(A Craft by Silence. Willow will do one next week)
Hello, there! Silence here. Today, I'm going to show (and tell) you how to make a cabinet for your doll(s)!
Let's get started, so without further ado! Pictures! YAY! Lol!

These are the supplies you'll need,
- Markers(optional)
- Glue Stick(s)
- Scissors
- Colorful paper (Or if you want the plain white showing, or neutral colored paper)
- A box that has a lid and two side flaps inside, such as an American Girl box
- Colored pencils(optional)
- Wooden dowels(Not shown, but chopsticks work, also.)
- Duct Tape
Step 1. Take your box, and cut off the top part, the 'lid'.


Step 3: Now, decorate the box! You can use paper to cover it, then color, whatever you want! Put sparkles, use your imagination! I know you've got one!

Step 4: Take your wooden dowels, (or chopsticks) and put them on the box like so (below) to see how big you need them to be

See what I mean? Now, mark your chopsticks (or dowels) just a little bit longer than the box, you'll see why. Now cut those things down to size! Ask a parent for help with this part, this can be very tricky!
Your back already? wow! Your fast, now that you've got those done, let's move onto step 5, shall we?
Step 5: Now that you have those dowels (or chopsticks) down to size, hold them a little ways apart from each other,like this:

Now, duct tape them together at that length that you find right, from middle to middle, make sense? Good!
Step 6: Now, take a sheet of paper, and cut it length wise, well, look at the picture below, it's too hard to explain:

See? You took a sheet of paper, cut it length-wise to fit just around your chopsticks, then taped it there! Good job! Yay for you! Now onto step 7:
Step 7: See what you just made? It's a shelf to go into your cabinet!! Now, take that shelf, and lodge it into the middle (or wherever you want your shelf to be) in your cabinet, it may be a little hard, so you may need parents help with this. Now, you've got a cabinet!! Yay for you! You did it! Wasn't that easy? Oh, and there's one last thing you may need to do, to hold your doors shut, take a small piece of duct tape, (or something of the sort) and stick it on one side of the door, then stick it on the other! If you did it right, it will hold the doors shut, and you can peel of one side only to open the doors of it!
Step 8: I'll add a bonus step, just for you! To make handles, either take a little piece of wire and bend it and stick it in there to make handles, (have a parent help) or glue beads on there as handles, make sense?
Now, you're done! You can use tape or something to put it up in your dolls room, (ask a parent if it's ok to hang on things) Or whatever you want!
Thanks for viewing! Please comment on what you thought,
Thanks! Silence.
P.S. Always have a parents permission before doing any of our crafts, we don't want you or us to get in trouble,
Thanks, Silence and Willow.
Great job, Willow! I love your decorating!
ReplyDeleteThank you, but this craft was mostly Silence's work:)
ReplyDelete~Willow~